
Summary
Spec Workflow MCP provides a structured spec-driven development framework with tools for sequential spec creation (Requirements → Design → Tasks), approval workflows with revision tracking, and task progress monitoring. The server offers three interfaces for interaction: a real-time web dashboard, VSCode extension integration, and MCP protocol tools, along with searchable implementation logs and support for 11 languages. It solves the problem of managing complex development workflows by centralizing spec documentation, approval processes, and task tracking in a unified system accessible across multiple platforms.
Agent, run crypto. Access onchain data & trade routes via 1inch.
Install now →On Capafy, your Skill runs online 24/7 as an agent product, and you get paid every time someone uses it.
Start earning →Connect Claude to +800M contacts, +150M companies. Find & Enrich leads in chat.
Try For Free →Integrate web data into your AI product. One API to scrape website & brand data.
Get API Key Now →Spec Workflow MCP


A Model Context Protocol (MCP) server for structured spec-driven development with real-time dashboard and VSCode extension.
☕ Support This Project

📺 Showcase
🔄 Approval System in Action
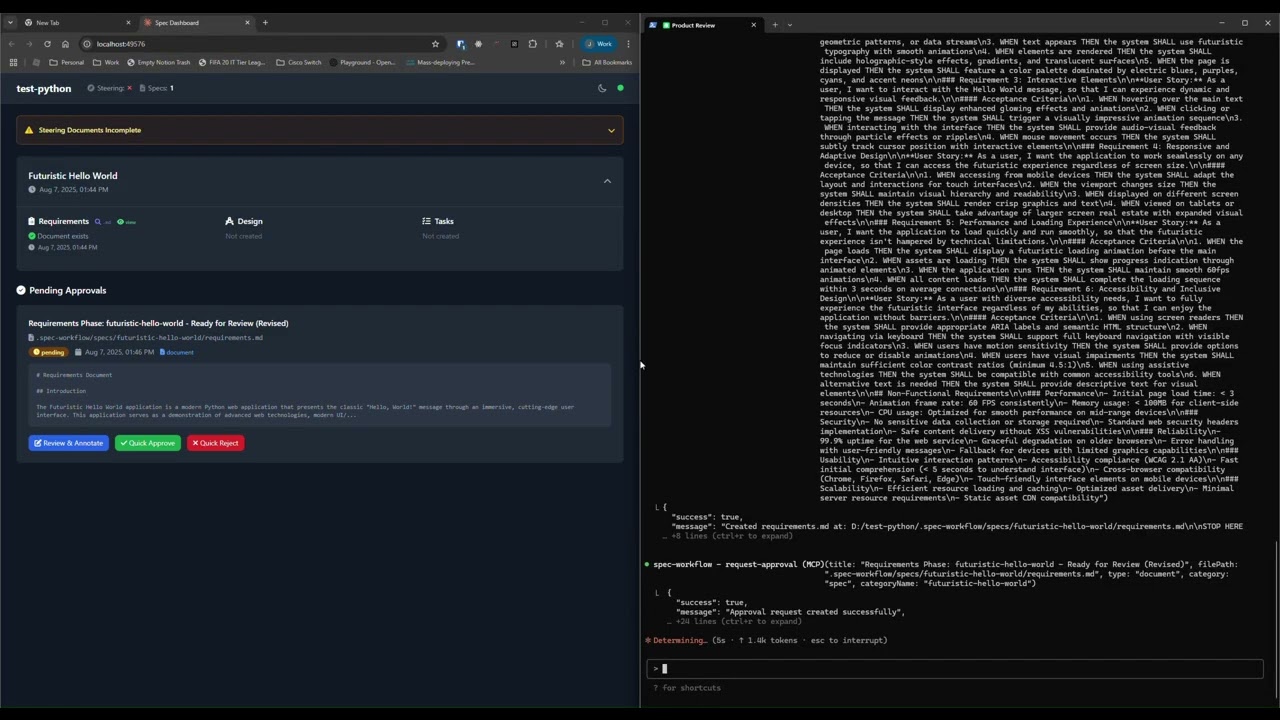
See how the approval system works: create documents, request approval through the dashboard, provide feedback, and track revisions.
📊 Dashboard & Spec Management
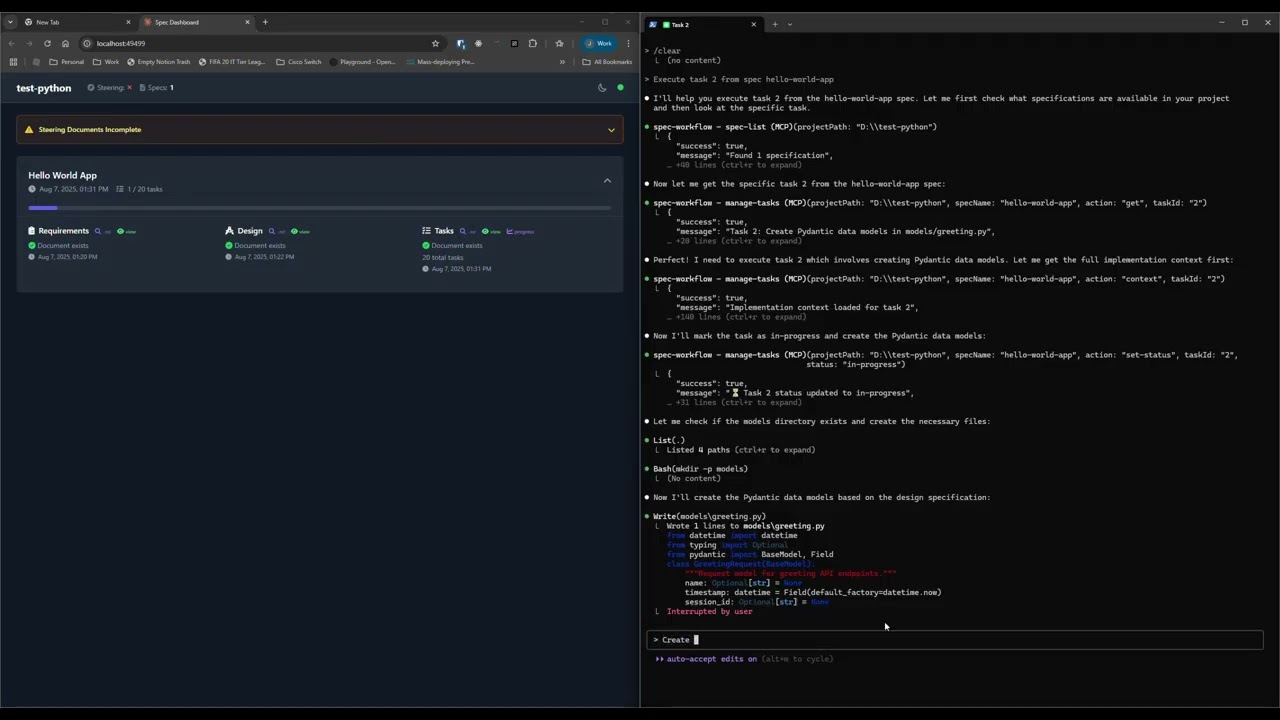
Explore the real-time dashboard: view specs, track progress, navigate documents, and monitor your development workflow.
✨ Key Features
- Structured Development Workflow - Sequential spec creation (Requirements → Design → Tasks)
- Real-Time Web Dashboard - Monitor specs, tasks, and progress with live updates
- VSCode Extension - Integrated sidebar dashboard for VSCode users
- Approval Workflow - Complete approval process with revisions
- Task Progress Tracking - Visual progress bars and detailed status
- Implementation Logs - Searchable logs of all task implementations with code statistics
- Multi-Language Support - Available in 11 languages
🌍 Supported Languages
🇺🇸 English • 🇯🇵 日本語 • 🇨🇳 中文 • 🇪🇸 Español • 🇧🇷 Português • 🇩🇪 Deutsch • 🇫🇷 Français • 🇷🇺 Русский • 🇮🇹 Italiano • 🇰🇷 한국어 • 🇸🇦 العربية
📖 Documentation in your language:
English | 日本語 | 中文 | Español | Português | Deutsch | Français | Русский | Italiano | 한국어 | العربية
🚀 Quick Start
Step 1: Add to your AI tool
Add to your MCP configuration (see client-specific setup below):
{
  "mcpServers": {
    "spec-workflow": {
      "command": "npx",
      "args": ["-y", "@pimzino/spec-workflow-mcp@latest", "/path/to/your/project"]
    }
  }
}
Step 2: Choose your interface
Option A: Web Dashboard (Required for CLI users) Start the dashboard (runs on port 5000 by default):
npx -y @pimzino/spec-workflow-mcp@latest --dashboard
The dashboard will be accessible at: http://localhost:5000
Note: Only one dashboard instance is needed. All your projects will connect to the same dashboard.
Option B: VSCode Extension (Recommended for VSCode users)
Install Spec Workflow MCP Extension from the VSCode marketplace.
📝 How to Use
Simply mention spec-workflow in your conversation:
- "Create a spec for user authentication" - Creates complete spec workflow
- "List my specs" - Shows all specs and their status
- "Execute task 1.2 in spec user-auth" - Runs a specific task
🔧 MCP Client Setup
Augment Code
Configure in your Augment settings:
{
  "mcpServers": {
    "spec-workflow": {
      "command": "npx",
      "args": ["-y", "@pimzino/spec-workflow-mcp@latest", "/path/to/your/project"]
    }
  }
}
Claude Code CLI
Add to your MCP configuration:
claude mcp add spec-workflow npx @pimzino/spec-workflow-mcp@latest -- /path/to/your/project
Important Notes:
- The
-yflag bypasses npm prompts for smoother installation - The
--separator ensures the path is passed to the spec-workflow script, not to npx - Replace
/path/to/your/projectwith your actual project directory path
Alternative for Windows (if the above doesn't work):
claude mcp add spec-workflow cmd.exe /c "npx @pimzino/spec-workflow-mcp@latest /path/to/your/project"
Claude Desktop
Add to claude_desktop_config.json:
{
  "mcpServers": {
    "spec-workflow": {
      "command": "npx",
      "args": ["-y", "@pimzino/spec-workflow-mcp@latest", "/path/to/your/project"]
    }
  }
}
Important: Run the dashboard separately with
--dashboardbefore starting the MCP server.
Cline/Claude Dev
Add to your MCP server configuration:
{
  "mcpServers": {
    "spec-workflow": {
      "command": "npx",
      "args": ["-y", "@pimzino/spec-workflow-mcp@latest", "/path/to/your/project"]
    }
  }
}
Continue IDE Extension
Add to your Continue configuration:
{
  "mcpServers": {
    "spec-workflow": {
      "command": "npx",
      "args": ["-y", "@pimzino/spec-workflow-mcp@latest", "/path/to/your/project"]
    }
  }
}
Cursor IDE
Add to your Cursor settings (settings.json):
{
  "mcpServers": {
    "spec-workflow": {
      "command": "npx",
      "args": ["-y", "@pimzino/spec-workflow-mcp@latest", "/path/to/your/project"]
    }
  }
}
OpenCode
Add to your opencode.json configuration file:
{
  "$schema": "https://opencode.ai/config.json",
  "mcp": {
    "spec-workflow": {
      "type": "local",
      "command": ["npx", "-y", "@pimzino/spec-workflow-mcp@latest", "/path/to/your/project"],
      "enabled": true
    }
  }
}
Windsurf
Add to your ~/.codeium/windsurf/mcp_config.json configuration file:
{
  "mcpServers": {
    "spec-workflow": {
      "command": "npx",
      "args": ["-y", "@pimzino/spec-workflow-mcp@latest", "/path/to/your/project"]
    }
  }
}
Codex
Add to your ~/.codex/config.toml configuration file:
[mcp_servers.spec-workflow]
command = "npx"
args = ["-y", "@pimzino/spec-workflow-mcp@latest", "/path/to/your/project"]
🐳 Docker Deployment
Run the dashboard in a Docker container for isolated deployment:
# Using Docker Compose (recommended)
cd containers
docker-compose up --build

# Or using Docker CLI
docker build -f containers/Dockerfile -t spec-workflow-mcp .
docker run -p 5000:5000 -v "./workspace/.spec-workflow:/workspace/.spec-workflow:rw" spec-workflow-mcp
The dashboard will be available at: http://localhost:5000
🔒 Security
Spec-Workflow MCP includes enterprise-grade security features suitable for corporate environments:
✅ Implemented Security Controls
| Feature | Description |
|---|---|
| Localhost Binding | Binds to 127.0.0.1 by default, preventing network exposure |
| Rate Limiting | 120 requests/minute per client with automatic cleanup |
| Audit Logging | Structured JSON logs with timestamp, actor, action, and result |
| Security Headers | X-Content-Type-Options, X-Frame-Options, X-XSS-Protection, CSP, Referrer-Policy |
| CORS Protection | Restricted to localhost origins by default |
| Docker Hardening | Non-root user, read-only filesystem, dropped capabilities, resource limits |
⚠️ Not Yet Implemented
| Feature | Workaround |
|---|---|
| HTTPS/TLS | Use a reverse proxy (nginx, Apache) with TLS certificates |
| User Authentication | Use a reverse proxy with Basic Auth or OAuth2 Proxy for SSO |
For External/Network Access
If you need to expose the dashboard beyond localhost, we recommend:
- Keep dashboard on localhost (
127.0.0.1) - Use nginx or Apache as a reverse proxy with:
- TLS/HTTPS termination
- Basic authentication or OAuth2
- Configure firewall rules to restrict access
# Example nginx reverse proxy with auth
server {
    listen 443 ssl;
    server_name dashboard.example.com;

    ssl_certificate /path/to/cert.pem;
    ssl_certificate_key /path/to/key.pem;

    auth_basic "Dashboard Access";
    auth_basic_user_file /etc/nginx/.htpasswd;

    location / {
        proxy_pass http://127.0.0.1:5000;
        proxy_http_version 1.1;
        proxy_set_header Upgrade $http_upgrade;
        proxy_set_header Connection "upgrade";
    }
}
🔒 Sandboxed Environments
For sandboxed environments (e.g., Codex CLI with sandbox_mode=workspace-write) where $HOME is read-only, use the SPEC_WORKFLOW_HOME environment variable to redirect global state files to a writable location:
SPEC_WORKFLOW_HOME=/workspace/.spec-workflow-mcp npx -y @pimzino/spec-workflow-mcp@latest /workspace
📚 Documentation
- Configuration Guide - Command-line options, config files
- User Guide - Comprehensive usage examples
- Workflow Process - Development workflow and best practices
- Interfaces Guide - Dashboard and VSCode extension details
- Prompting Guide - Advanced prompting examples
- Tools Reference - Complete tools documentation
- Development - Contributing and development setup
- Troubleshooting - Common issues and solutions
📁 Project Structure
your-project/
  .spec-workflow/
    approvals/
    archive/
    specs/
    steering/
    templates/
    user-templates/
    config.example.toml
🛠️ Development
# Install dependencies
npm install

# Build the project
npm run build

# Run in development mode
npm run dev
📄 License
GPL-3.0
⭐ Star History
Featured
Agent, run crypto. Access onchain data & trade routes via 1inch.
Install now →On Capafy, your Skill runs online 24/7 as an agent product, and you get paid every time someone uses it.
Start earning →Connect Claude to +800M contacts, +150M companies. Find & Enrich leads in chat.
Try For Free →Integrate web data into your AI product. One API to scrape website & brand data.
Get API Key Now →