
Summary
Wraps Apple's Vision Framework to run OCR, face detection, barcode reading, and image classification entirely on your Mac. Instead of sending a 44-page PDF to Claude as 73,500 tokens, it extracts structured text locally first (paragraphs, bounding boxes, reading order) and costs around 2,400 tokens. Works with any MCP client over stdio. Exposes five tools: ocr_image for text extraction, detect_faces, detect_barcodes, classify_image, and analyze_document for full pipelines that return JSON ready for the model to rebuild as Markdown or HTML. Requires macOS 13.0+ and runs offline after install. Useful when you're processing contracts, invoices, or medical records and want the file to stay local while still getting structured output the LLM can reason over.


Keeps your Mac awake while Claude Code, Codex or Cursor works. Lets it sleep when they are done.
Try free for 7 days →

Block distracting apps from your iPhone permanently without a 3rd party app. Free and open source.
Block now (100% free) →
Notes, actions and memory. Without a meeting bot. First month 100% off.
Download for free →
belt cli automatically finds the best tools and skills for your agent. image, video, music, tts...
one prompt install →
Free an open-source skills that make AI coding agents easier to understand, verify, and control.
Download for free →

Connect your Claude agent to live crypto prices and trading routes via 1inch
Get the MCP →

macos-vision-mcp
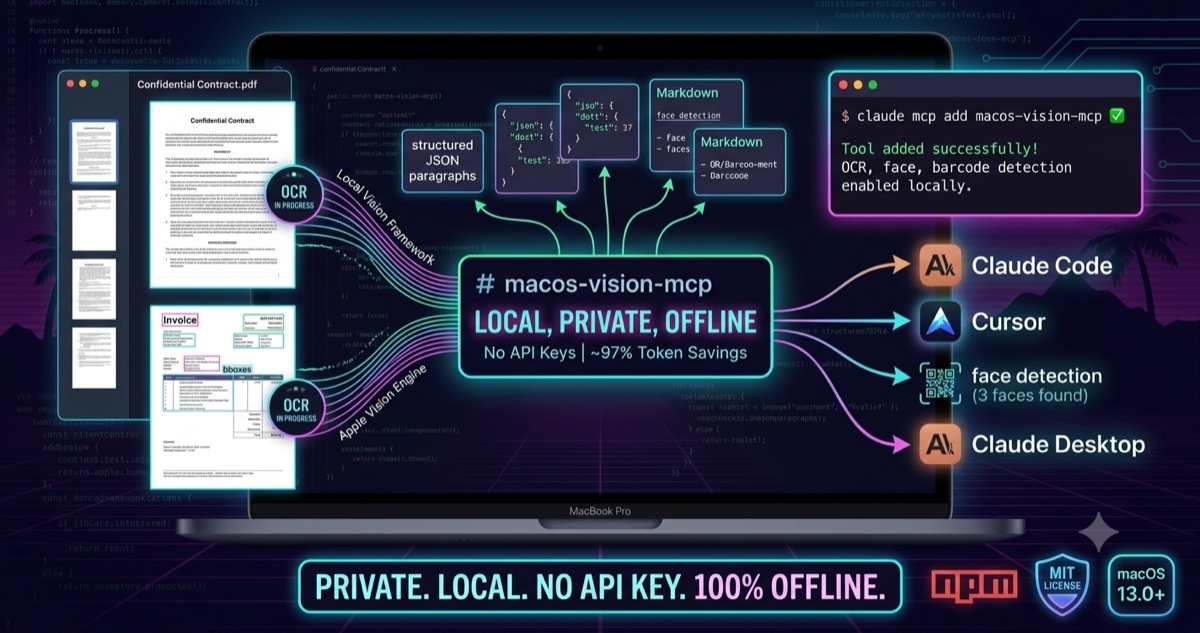
Your documents and your screen stay on the machine. Only extracted text and structured JSON ever reach the model.
Local, private, offline OCR and UI testing for any MCP client — no API keys, no uploads. Cut document token costs by ~97%, and let an agent see and click your Mac's UI without a single screenshot leaving the machine.








Pre-extracts text and image data locally before your AI ever sees it — cutting token usage by ~97% on real documents and returning structured paragraphs, lines, and bounding boxes so the model can reconstruct the document into Markdown, HTML, DOCX, or any other format. Files never leave your Mac: no cloud API, no API keys, no network requests.
How the ~97% is measured: a 44-page scanned PDF sent as page images costs ~73,500 tokens; the same file run through
analyze_documentreturns ~2,400 tokens of extracted text and structure (raw page-image tokens vs. extracted-text tokens). Your numbers vary with page density and tokenizer — treat 97% as the order of magnitude, not a guarantee.
Contents: Quick Start · What you get · What agents use this for · UI testing · Why it's different · Available Tools · Usage · Example workflows · Configuration · Privacy layer
What you get
- OCR for images and PDFs (JPG, PNG, HEIC, TIFF, multi-page PDF) via Apple Vision Framework.
- ~97% token reduction: a 44-page PDF costs ~2,400 tokens instead of ~73,500.
- Reading-order paragraphs + raw text blocks with bounding boxes — rich structure for the model to reconstruct the document into any output format (Markdown, HTML, DOCX, JSON), not a lossy plain-text dump.
- Face detection, barcode/QR reading, and image classification — all on-device.
- Full document pipeline: OCR + faces + barcodes + rectangles in a single tool call.
- Works with Claude Code, Claude Desktop, and Cursor — any MCP-compatible client.
- No files uploaded to any server — processing stays entirely on your Mac.
- UI testing for agents: screenshot a window locally, find an element by its visible text, get back click coordinates, and assert what's on screen — all without uploading the screenshot.
- 100% offline after
npm install— powered by Apple Vision Framework, same engine as Live Text in Photos.app.
❌ Without / ✅ With
❌ Without macos-vision-mcp:
- Sending a 44-page PDF costs ~73,500 tokens
- Every image, invoice, or contract goes through a cloud API
- Sensitive documents leave your machine on every request
✅ With macos-vision-mcp:
- Local Apple Vision pre-extracts text before Claude ever sees it
- ~2,400 tokens for the same 44-page PDF — 97% fewer
- Files never leave your Mac
What agents use this for
Most work an agent does on a Mac needs no deep understanding of a layout. It needs to see what is
on screen, find the thing it is looking for, act on it, and confirm what happened. That loop —
list_windows → find_element → click (via any input driver) → assert_text — covers a lot,
and every step of it runs on the machine.
- Drive an app that has no API. Native tools, Electron apps, internal software, anything with
a GUI and no scripting interface.
find_element("Export")returns the point to click. - Read what is on screen right now. A dialog, an error banner, a notification, a progress state — including a window sitting behind others, without bringing it to the front.
- Confirm an action actually worked.
assert_textis string matching after unicode normalisation, so it answers pass/fail the same way every time instead of asking a model to judge a picture. - Pull data out of software that will not export it. OCR a window, get the text, move on.
- Audit accessibility.
ui_snapshotreports every piece of visible text the accessibility tree does not account for — unlabelled controls and custom-drawn text, with coordinates. - Test a UI for regressions. The case this started as, and still a good one — see the chapter below.
- Work through documents. The original job: invoices, contracts, scans, PDFs.
Why doing it locally is better, not just different
Cheaper. A verdict costs ~240 tokens against ~6,900 for the screenshot it replaces — about 29×. Over a twenty-step task that is ~4,800 tokens instead of ~138,000. It is the difference between an agent that can afford to check its work after every step and one that cannot.
More private, and this is the part that never shows up on a bill. A screenshot is not a neat crop of the button you cared about. It carries whatever else was on screen: another window, a password manager, an open inbox, a customer's record. Sending one to a third party is a disclosure you cannot withdraw, and it repeats on every single step. Here the image is written to a temp file, read by a model on the Neural Engine, and never serialised into the conversation. That invariant is enforced in the code, not promised in this README: no tool returns image bytes.
Faster in practice, and predictable, which matters more. find_element takes 1.17–1.25 s end
to end on an M1 Pro — capture 0.31–0.41 s, OCR ~1.04 s, matching under a millisecond. There is no
network term at all: no ~750 KB upload before inference can start, no rate limit, no provider
under load, no failure when the Wi-Fi drops. The same call costs the same on a plane as it does
at a desk.
What this does not do: click. It is eyes, not hands, and therefore never asks for control of your machine. Pair it with an input driver —
cliclick, amacos-mcp-style automation server, or anything that accepts screen coordinates — and hand it theclickPointthatfind_elementreturns. The split is deliberate: seeing and acting are different permissions, and this server only ever asks for the first.
UI testing without sending screenshots anywhere
The usual way to let an agent work with a GUI is to screenshot the screen and upload it to a vision model. That is one network round trip, one image-token bill, and one copy of whatever was on screen — per step. A ten-step flow means ten uploads of your desktop.
This server does the seeing locally. Apple's Vision framework runs on the Neural Engine, so the screenshot stays on disk and only text, geometry, and verdicts reach the model.
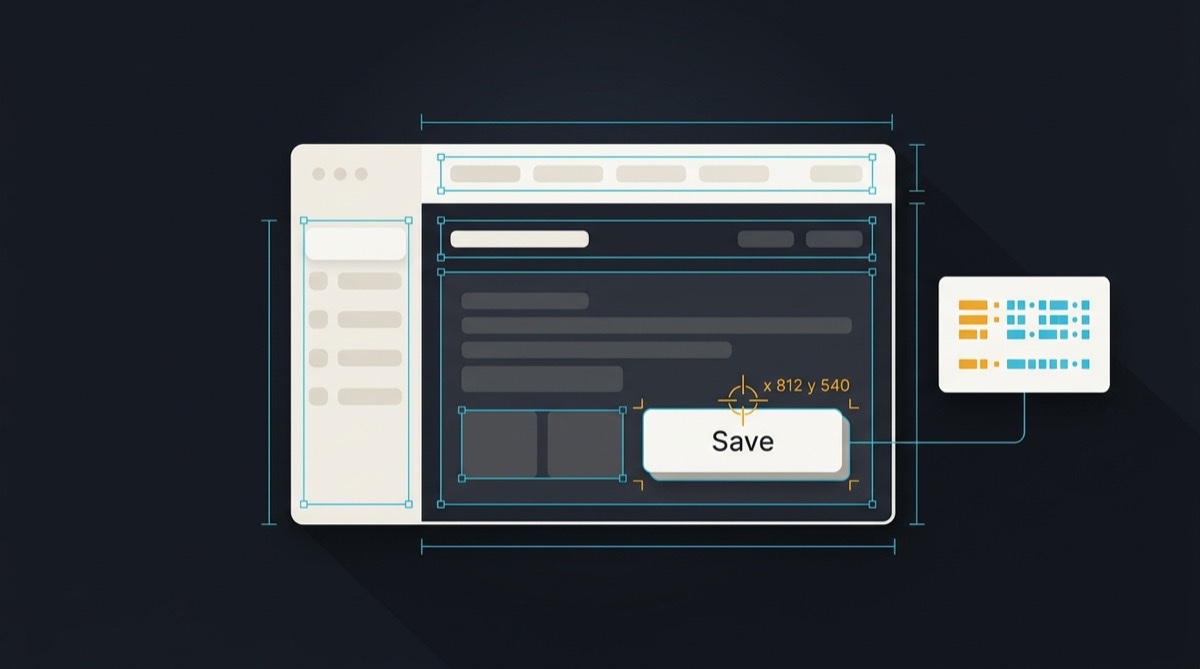
What the agent actually receives. Element boxes, roles and labels — measured, not guessed — and the exact point to click. The screenshot itself never leaves the Mac.
find_element(query: "Save", app: "MyApp")
  → { found: true, matches: [{ text: "Save", method: "exact",
        clickPoint: { x: 812, y: 556 }, bbox: {...} }] }

# hand clickPoint to any input driver — macos-mcp, cliclick, CGEvent
# then verify, again locally:

assert_text(expect: "Saved", app: "MyApp")  → { pass: true, ... }
clickPoint is in global screen points with a top-left origin — the same space click drivers
use, so it goes straight to a driver with no conversion. This server deliberately does not click:
it is eyes, not hands, and therefore never asks for control of your machine.
Is it actually cheaper, safer, and faster?
Measured on an Apple M1 Pro (2021, 16 GB) against a 2992×1734 Retina window capture of a real, text-dense app — median of five runs each.
| Local (this server) | Screenshot → cloud vision API | |
|---|---|---|
| Tokens per step | ~240 (an assert_text verdict) | ~6,900 (image tokens for 2992×1734) |
| Data leaving the Mac | none | ~750 KB PNG of your screen, per step |
| Network | none — works offline, on a plane, behind an air gap | one round trip per step |
| Latency | 1.17–1.25 s end-to-end for find_element | upload + inference + return |
| Cost | $0 | per-image, per-step, forever |
Image tokens are estimated with Anthropic's
width × height / 750rule; other providers tile differently, so the exact figure moves but the order of magnitude does not. Local token counts are the actual JSON payloads the tools returned, at ~4 characters per token.
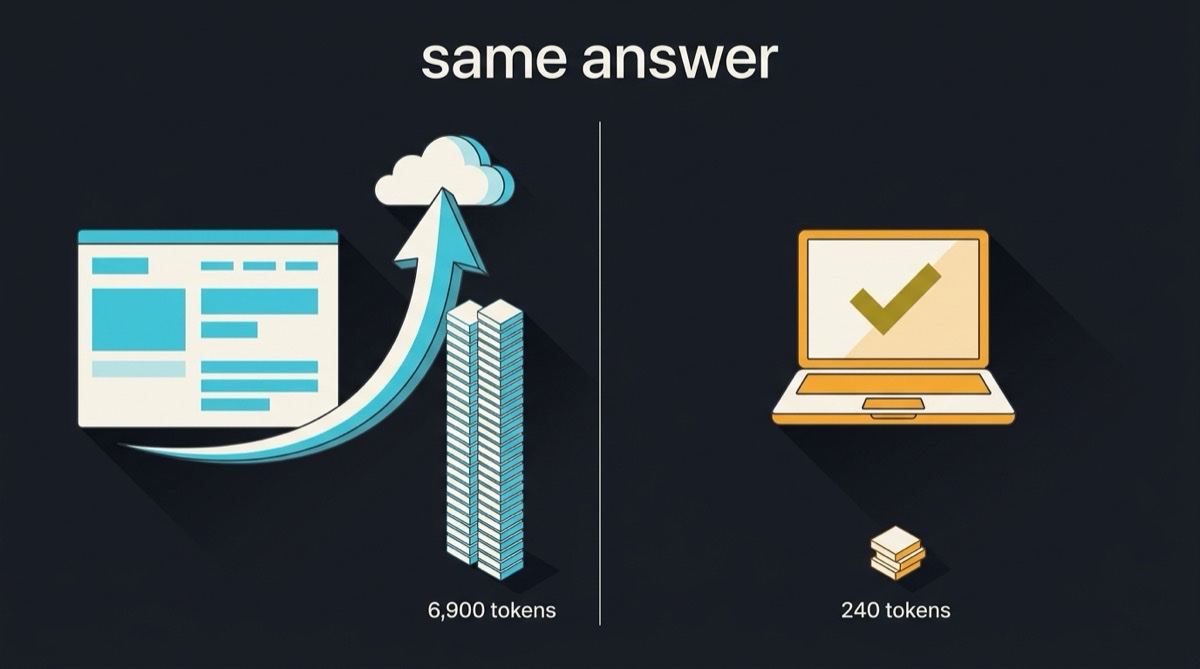
Same question, same answer, ~29× the price. Measured on an M1 Pro against a 2992×1734 window capture.
The three claims behind that table — cheaper, safer, faster — are argued in What agents use this for above. What this section adds is the measurement: the numbers are a median of five runs on an Apple M1 Pro (2021, 16 GB) against a 2992×1734 Retina capture of a real, text-dense window.
We have not benchmarked any specific vision provider, so treat the right-hand column as structure rather than a measured figure. What can be stated is that the local path has no variance from bandwidth, rate limits or provider load, and does not fail when the network does.
Two honest caveats. Targeting a single region instead of a whole window cuts the OCR term sharply, since cost scales with pixels searched. And the first call after install spends ~2 s compiling a small Swift helper; every call after that is warm.
What it is good at — and what it is not
Good at: native macOS apps, Electron apps with poor accessibility, canvas/WebGL UIs, games,
and design mockups — anything where there is no DOM to query. Also good when you want a
deterministic assertion rather than a model's opinion: assert_text is string matching after
unicode normalisation, so it returns the same answer every time.
Not the right tool for a plain web page: Playwright or the DOM will be faster and more precise
there. And OCR only sees what is rendered, so it cannot read a control's enabled state or its
accessibility role.
Text matching is normalised before comparison — NFC, collapsed whitespace, unicode dashes and
quotes folded — then tried exact → substring → fuzzy (Levenshtein). When a match is rejected it
is still reported under nearMisses, so "the label is there but OCR read Zapisr for Zapisz"
is distinguishable from "the label is genuinely absent".
Substring hits are graded rather than treated alike: a query that stands on word boundaries,
opens the label, and covers more of it scores higher. That ordering matters when the answer is
a button — for the query Save, Save Changes must outrank Don't Save. Each match reports
wholeWord, and assert_text decides its verdict only on matches where it is true: Save
inside Unsaved changes is a coincidence of spelling, and it neither proves a Save button is on
screen nor proves it is gone. Such hits are still listed, under incidental.
Requirements
-
Screen Recording permission for the app hosting the MCP server (Terminal, Claude Desktop, Cursor): System Settings → Privacy & Security → Screen Recording, then restart that app. No compiler or Xcode tooling is needed — the native helper arrives prebuilt.
The grant is per host process, not per package: the same server can be fully working under one client and blind under another on the same Mac. Without it, capture fails outright and macOS additionally withholds every window title, so
list_windowsreportstitle: ""for everything — that case is flagged astitlesAvailable: falserather than left to look like a screen full of untitled windows. Runvision_capabilitiesfirst:readyandblockerssay what works right now. -
An unlocked Mac. On a locked machine window and region capture fail outright and a full-screen capture returns only the lock screen;
vision_capabilitiesreportsscreenLockedso an agent can check before it starts rather than guessing at a failure afterwards.
Why it's different
Most OCR options for LLMs either ship your documents to a cloud vision API or make you stand up and tune your own engine. This runs on Apple's on-device Vision framework — the same engine behind Live Text in Photos.app — so extraction is free, private, and instant.
| macos-vision-mcp | Cloud vision OCR (GPT-4o, Google Vision, Mistral OCR) | Tesseract-based MCP | |
|---|---|---|---|
| Cost | $0 — no per-page or per-token fees | Per-call / per-page billing | $0, but self-hosted |
| Offline | Yes, after install | No — every page hits the network | Yes |
| Privacy | Files never leave your Mac | Documents uploaded to a third party | Local |
| Setup | One command, no keys | API key + billing account | Install + language data + tuning |
| Quality | Apple Vision (strong on clean scans, receipts, screenshots) | Generally high | Varies; weaker on poor scans |
| UI testing | Built in — capture, locate, assert, no uploads | Possible, but every step uploads your screen | OCR only; no capture or targeting |
The trade-off is honest: it's macOS-only, and on heavily skewed or low-contrast scans a cloud model may still read more. For the common case — invoices, contracts, receipts, screenshots, clean PDFs — you get cloud-grade extraction with zero cost, zero setup, and nothing leaving your machine.
Privacy layer
macos-vision-mcp acts as a local pre-processing layer between your documents and the cloud. Useful for:
- Legal documents, contracts, NDAs
- Financial reports, invoices, internal spreadsheets
- Medical records or any GDPR-sensitive content
- Any situation where you want to extract structured data locally before deciding what (if anything) to send upstream
Instead of sending the raw document to your AI, you extract the text and structure locally first. The model then works only with the extracted text — never the original file.
The same applies to your screen. A screenshot taken for one small check still carries everything else that happened to be visible — other windows, a password manager, a customer record, an open inbox. The UI-testing tools keep that image on disk and return only paths, geometry, and text, so a UI assertion does not become an unplanned disclosure. No tool in this server returns image bytes to the model.
Quick Start
Add to your MCP client (example for Claude Code):
claude mcp add macos-vision-mcp -- npx -y macos-vision-mcp
Using Claude Desktop or Cursor? Jump to Configuration ↓
Restart your client. npx fetches the package on first run, caches it, and the tools appear automatically — no separate install step. This is the convention used by most MCP servers and recommended by Anthropic, Cursor, and other clients.
Note: On first run, the package downloads prebuilt Swift helper binaries (
vision-helper,pdf-helper,ui-helper,ax-helper) from its GitHub Releases (~276 KB compressed, ~1–2s). Subsequent invocations hit the npx cache and start instantly. Xcode Command Line Tools are only required as a fallback when the download can't reach the network — setMACOS_VISION_SKIP_DOWNLOAD=1to force local compilation withswiftc.
Prefer instant cold-starts (no npx cache lookup)? Install globally with
npm install -g macos-vision-mcpand use the alternative config shown at the bottom of Configuration.
Available Tools
| Tool | What it does | Example prompt |
|---|---|---|
ocr_image | Extract text from an image or PDF (JPG, PNG, HEIC, TIFF, PDF). Returns plain text, or per-page paragraphs + text blocks with lineId / paragraphId and bounding boxes. Accepts start_page / max_pages for partial PDF OCR. | "Read the text from ~/Desktop/screenshot.png" |
detect_faces | Detect human faces and return their count and positions. | "How many people are in this photo?" |
detect_barcodes | Read QR codes, EAN, UPC, Code128, PDF417, Aztec, and other 1D/2D codes. | "What does the QR code in /tmp/qr.jpg say?" |
detect_document | Detect the four corner points of a document in a photo (paper, receipt, ID). Useful as a crop / deskew hint before OCR. | "Find the document corners in ~/Desktop/receipt.jpg" |
classify_image | Classify image content into 1000+ categories with confidence scores. | "What is in this image?" |
analyze_document | Returns structured JSON with reading-order paragraphs, raw text blocks (bbox / confidence), faces, barcodes, and rectangles — ready for the model to reconstruct into Markdown, HTML, or anything else. Also accepts start_page / max_pages for long PDFs. | "Reconstruct ~/Desktop/scan.pdf as clean Markdown" |
UI-testing tools (local, no screenshots sent to the cloud)
These tools let an agent see and verify your Mac's UI without ever sending a screenshot to a
cloud model. Screenshots are captured locally, OCR runs on-device, and only paths, geometry,
and extracted text are returned. find_element gives click coordinates in screen points, ready
to hand to any input driver (this server deliberately does not click — eyes, not hands).
| Tool | What it does | Example prompt |
|---|---|---|
capture_screen | Screenshot the main display, a window (even occluded), an app's frontmost window, or a region. Returns the file path + screen-point frame — never the image bytes. | "Capture the Safari window" |
list_windows | List on-screen windows with global screen-point bounds, front-to-back. | "What windows are open?" |
read_screen_text | Capture + OCR in one step — read what an app shows right now, fully offline. | "What does the TestFlight window say?" |
find_element | Find a UI element by visible text; returns clickPoint {x,y} in global screen points (exact → substring → fuzzy matching with near-miss reporting). | "Where is the Save button in MyApp?" |
assert_text | Local pass/fail assertion that text is present on / absent from the screen — the verdict is computed on your Mac, not by a cloud model. | "Verify the dialog says 'Saved' after clicking Save" |
vision_capabilities | Report macOS version, Screen Recording / Accessibility permission state, and displays. | "Can this machine run UI tests?" |
ui_snapshot | Return the whole layout as JSON: every element's exact box, role, label and state from the accessibility tree, optionally with colours and fonts — plus visible text the tree does not account for. | "Review this dialog's layout" · "What is unlabelled?" |
Requires Screen Recording permission for the app hosting the MCP server (Terminal / Claude Desktop / Cursor): System Settings → Privacy & Security → Screen Recording, then restart that app. Nothing else to install — the native helper ships prebuilt with
macos-vision.
ui_snapshot — the layout, not just the text
find_element answers "where is X". ui_snapshot answers "what is on this screen": every
element's measured box (from the accessibility API, not inferred from OCR), its role, label
and enabled state, the parent/child structure, and optionally colours sampled from the capture
and real font data.
{
  "app": "MyApp",
  "window": [0, 29, 1496, 867],
  "source": "ax+px",
  "budget": { "elements": 289, "walked": 400, "capped": false, "elapsedMs": 136 },
  "nodes": [
    {
      "id": 42,
      "parent": 7,
      "role": "Button",
      "label": "Zapisz",
      "box": [812, 540, 96, 32],
      "style": { "bg": "#2F6FEB", "border": "#1B4FC4", "borderWidth": 1 },
      "text": { "font": "SFPro-Semibold", "size": 13, "align": "center" },
    },
  ],
  "unresolved": [{ "text": "Sprzedaż Q4", "box": [420, 300, 88, 16], "coveredByNode": 17 }],
  "summary": {
    "nodes": 289,
    "labelled": 240,
    "ocrBlocks": 123,
    "unresolved": 21,
    "axTextCoverage": 0.83,
  },
}
unresolved is text Vision can read that no accessibility node accounts for. It completes the
picture where AX is blind — canvas, WebGL, games, text baked into images — and each entry is an
accessibility gap in the app: coveredByNode present means a control is there but unlabelled,
absent means nothing is exposed at all.
Read it honestly: budget.capped means the tree is incomplete, and summary.axTextCoverage
is null in that case on purpose — a capped walk measures how much was visited, not how
accessible the app is. Colours come from pixels, so an occluded element reports whatever is drawn
on top; borderWidth is inferred and there is no padding or margin. This is not the CSS box
model.
Needs Accessibility permission in addition to Screen Recording, and an unlocked Mac — a locked screen exposes no accessibility windows at all.
Usage
Use the tool name explicitly in your prompt to guarantee local processing:
Extract text from an image or PDF:
Use ocr_image to extract text from ~/Desktop/invoice.pdf
Detect faces in a photo:
Use detect_faces on ~/Photos/team.jpg and tell me how many people are in it
Classify image content:
Use classify_image on ~/Downloads/unknown.jpg
Full document analysis + reconstruction:
Use analyze_document on ~/Desktop/report.pdf and reconstruct it as clean Markdown
The tool returns structured JSON; the model picks the output format you ask for (Markdown, HTML, DOCX outline, etc.) without any extra dependencies — no Ollama, no cloud LLM, no extra tooling.
Example workflows
Real-world combinations that work out of the box once the server is connected:
- "Convert PDF → clean Markdown for LLM" —
analyze_documentreturns reading-order paragraphs and bounding boxes; the model renders Markdown ready to drop into a docs site, knowledge base, or RAG pipeline. - "Extract invoice data locally before sending to GPT" — pull line items, totals, vendor, and dates from the PDF locally with
analyze_document, then send only the structured JSON upstream. The original document never leaves your Mac. - "Scan receipts → JSON → expense tracker" —
ocr_imageon a phone photo, the model normalizes amount / date / merchant, and pipes the result straight into your expense tool's API. - "Decode a QR code from a screenshot" —
detect_barcodesreturns the decoded value plus symbology in one round trip. - "Crop a photo of a paper form before OCR" —
detect_documentreturns the four corner points so you (or a downstream tool) can deskew and crop the image before reading the text. - "Click the Save button in my app" —
find_elementreturnsclickPointin screen points; hand it to a click driver (macos-mcp, cliclick). The screenshot never leaves the Mac. - "Check my app still renders correctly after this change" —
assert_textgives a deterministic pass/fail on what is on screen, at ~240 tokens per check instead of ~6,900 for the screenshot. - "Read the error message in that background window" —
read_screen_textcaptures a specific window, even one hidden behind others, and returns just the text. - "What is my app showing right now?" —
list_windowsto pick the target,read_screen_textto read it, without bringing the window to the front.
Output schema (analyze_document)
{
  "source": { "path": "...", "pageCount": 1, "isPdf": false },
  "pages": [
    {
      "page": 0,
      // primary surface for reconstruction — reading-order paragraphs joined with "\n"
      "paragraphs": [
        { "paragraphId": 0, "lineIds": [0], "text": "ACME COFFEE" },
        { "paragraphId": 1, "lineIds": [1, 2], "text": "12 Main St\nPortland, OR" },
      ],
      // spatial fallback — raw blocks with page-local 0–1 bbox, confidence, line/paragraph membership
      "textBlocks": [
        {
          "text": "ACME COFFEE",
          "lineId": 0,
          "paragraphId": 0,
          "confidence": 0.99,
          "bbox": { "x": 0.21, "y": 0.04, "width": 0.58, "height": 0.06 },
        },
      ],
      "faces": [],
      "barcodes": [],
      "rectangles": [],
    },
  ],
  "summary": {
    "totalTextBlocks": 8,
    "totalParagraphs": 2,
    "totalFaces": 0,
    "totalBarcodes": 0,
    "totalRectangles": 0,
  },
}
Use paragraphs[].text for the 95% case (rebuild Markdown/HTML/plain text directly). Reach for textBlocks[] when you need spatial context — multi-column layouts, tables, forms, IDs.
Notes:
ocr_imageinblocksmode returns the same per-page shape minus the detection sections:{ pages: [{ page, paragraphs, textBlocks }] }.- PDFs are processed page by page. All coordinates are page-local (0–1), and
paragraphId/lineIdreset on every page. - Face, barcode, and rectangle detection on PDFs is best-effort — the underlying binary analyzes the file as a whole rather than per page, so any detections returned are attached to page 0 only.
- Paragraph grouping uses spatial heuristics. For multi-column layouts (magazine spreads, wiki pages with side panels) the heuristic can collapse the whole page into a single paragraph. When that happens, fall back to
textBlocks[]and reconstruct from the bounding boxes.
Configuration
All examples below use npx -y — the recommended default. No prior npm install needed; the package is fetched and cached on first run, and updates pick up automatically when the npx cache rolls over.
Claude Code
claude mcp add macos-vision-mcp -- npx -y macos-vision-mcp
Claude Desktop
Edit ~/Library/Application Support/Claude/claude_desktop_config.json:
{
  "mcpServers": {
    "macos-vision-mcp": {
      "command": "npx",
      "args": ["-y", "macos-vision-mcp"]
    }
  }
}
Cursor
Add to ~/.cursor/mcp.json:
{
  "mcpServers": {
    "macos-vision-mcp": {
      "command": "npx",
      "args": ["-y", "macos-vision-mcp"]
    }
  }
}
Alternative: global install
If you'd rather skip the npx cache lookup on cold starts — or you want to pin a specific version — install once:
npm install -g macos-vision-mcp
…then use "command": "macos-vision-mcp" (no args) in any of the JSON configs above, or claude mcp add macos-vision-mcp -- macos-vision-mcp for Claude Code. Note that global installs can break when switching Node versions with nvm / asdf / volta — re-run npm install -g after switching.
Support
If macos-vision-mcp saved you tokens or kept a document on your Mac, consider starring the repo — it helps others find it.
Contributing
Contributions are welcome. Please follow Conventional Commits for commit messages.
Releases run on changesets. If your change is user-visible, add a changeset to the PR:
npm run changeset # pick patch / minor / major, describe the change
Merging to master then opens a "version packages" PR that bumps the version, server.json and the changelog; merging that PR publishes to npm (Trusted Publishing, with provenance), tags the release, and refreshes the MCP registry entry.
git clone <repo>
cd macos-vision-mcp
npm install
npm run dev   # watch mode
License
MIT — Adrian Wolczuk
Featured
Keeps your Mac awake while Claude Code, Codex or Cursor works. Lets it sleep when they are done.
Try free for 7 days →Block distracting apps from your iPhone permanently without a 3rd party app. Free and open source.
Block now (100% free) →Notes, actions and memory. Without a meeting bot. First month 100% off.
Download for free →belt cli automatically finds the best tools and skills for your agent. image, video, music, tts...
one prompt install →Free an open-source skills that make AI coding agents easier to understand, verify, and control.
Download for free →Connect your Claude agent to live crypto prices and trading routes via 1inch
Get the MCP →