
Summary
Bridges MCP-compatible editors to a running NVIDIA Isaac Sim 5.1.0 instance over TCP, exposing 42 tools that let you spawn robots, compose scenes, attach sensors, and step through physics with plain-English prompts. You get access to 107+ prebuilt robot assets (Franka, UR, Unitree, Boston Dynamics), Action Graph builders for scripting logic, hot-reload for Python controllers, and step-and-observe debugging that returns prim transforms and joint states in one call. Setup requires installing the PyPI package plus a bundled Omniverse extension, then pointing your IDE at the startup script. Built for roboticists who want to prototype simulation setups and debug multi-robot scenarios without leaving their editor or writing boilerplate USD assembly code.


Keeps your Mac awake while Claude Code, Codex or Cursor works. Lets it sleep when they are done.
Try free for 7 days →

Block distracting apps from your iPhone permanently without a 3rd party app. Free and open source.
Block now (100% free) →
Notes, actions and memory. Without a meeting bot. First month 100% off.
Download for free →
belt cli automatically finds the best tools and skills for your agent. image, video, music, tts...
one prompt install →
Free an open-source skills that make AI coding agents easier to understand, verify, and control.
Download for free →

Connect your Claude agent to live crypto prices and trading routes via 1inch
Get the MCP →Isaac Sim MCP Server




Natural language control for NVIDIA Isaac Sim through the Model Context Protocol (MCP).
Connect any MCP-compatible IDE (Cursor, VS Code, Claude Code, Windsurf, Antigravity, JetBrains) to a running Isaac Sim instance and control it with plain-English prompts -- create robots, build scenes, run simulations, and debug physics all from your editor.
Highlights
- 43 tools across 9 categories -- scene, objects, lighting, robots, sensors, materials, assets, simulation, graphs
- 107+ robots auto-discovered from the Isaac Sim asset library (Franka, UR, Unitree, Boston Dynamics, and more)
- Step-and-observe debugging -- step the simulation and inspect prim positions, joint states, and physics in one call
- Hot-reload -- iterate on Python controllers without restarting Isaac Sim
- Multi-instance -- run multiple Isaac Sim sessions side by side on different ports
- Built for Isaac Sim 5.1.0 - 6.0.1 (PhysX + Newton) with a modular adapter layer for version isolation
Installation
Option A: pip install (recommended)
pip install isaacsim-mcp-server
This installs the MCP server and the isaacsim-mcp-server CLI. You still need the Isaac Sim extension from the repo (see Launching Isaac Sim below).
Option B: From source
git clone https://github.com/whats2000/isaacsim-mcp-server
cd isaacsim-mcp-server
./scripts/setup_python_env.sh
Requirements
| Requirement | Version |
|---|---|
| NVIDIA Isaac Sim | 5.1.0 - 6.0.1 (PhysX or Newton) |
| Python | 3.10+ |
uv | latest (for source install) |
| Platform | Linux (Ubuntu 22.04+) or Windows 10/11 |
[!IMPORTANT] Linux and Windows are supported. On Windows, use the PowerShell launcher
scripts/run_isaac_sim.ps1in place of the.shscripts (see below). macOS is not supported because NVIDIA Isaac Sim does not run on macOS.
[!NOTE] We are welcoming contributions to support other Isaac Sim versions. The adapter layer is designed for easy version isolation.
Quick Start
1. Set up the environment
If you installed from source:
./scripts/setup_python_env.sh
On Windows, uv sync creates the virtual environment (.venv) and installs
the package plus its dependencies:
uv sync
2. Launch Isaac Sim with the extension
./scripts/run_isaac_sim.sh
You should see in the logs:
Registered 43 command handlers
Isaac Sim MCP server started on localhost:8766
The script looks for Isaac Sim in $HOME/isaacsim; set ISAACSIM_ROOT to use a
different install.
Choosing the physics engine. Isaac Sim 6.0+ ships PhysX (default) and Newton
backends. Select one with --newton / --physx, or ISAACSIM_ENGINE:
./scripts/run_isaac_sim.sh                  # PhysX (default)
./scripts/run_isaac_sim.sh --newton         # Newton
ISAACSIM_ENGINE=newton ./scripts/run_isaac_sim.sh
The same flags work with scripts/launch_isaac_sim_mcp.sh. Everything else on
the command line is forwarded to Kit untouched. The server auto-detects the
active engine, so no MCP-side configuration changes. Newton requires 6.0 or
newer; asking for it on 5.1.0 fails with a clear message.
On Windows, use the PowerShell launcher instead. It takes the same engine selection and forwards extra arguments to Kit:
.\scripts\run_isaac_sim.ps1                          # PhysX (default)
.\scripts\run_isaac_sim.ps1 -Engine newton           # Newton
$env:ISAACSIM_ENGINE = 'newton'; .\scripts\run_isaac_sim.ps1
The script resolves the install from -IsaacSimRoot, then $env:ISAACSIM_ROOT,
then a local source build, then C:\isaacsim, then %USERPROFILE%\isaacsim. It
also creates a writable USD working directory (.cache\usd) since Windows has no
/tmp.
Optional: Beaver3D / NVIDIA API keys for 3D generation
export BEAVER3D_MODEL="<your beaver3d model name>"
export ARK_API_KEY="<your beaver3d api key>"
export NVIDIA_API_KEY="<your nvidia api key>"
On Windows (PowerShell):
$env:BEAVER3D_MODEL = "<your beaver3d model name>"
$env:ARK_API_KEY = "<your beaver3d api key>"
$env:NVIDIA_API_KEY = "<your nvidia api key>"
3. Connect your IDE
Add the MCP server to your editor. Replace the path with your actual repo location.
The command examples are for Linux/macOS; each guide shows the Windows
equivalent, which wraps the PowerShell launcher scripts\run_mcp_server.ps1.
Claude Code (CLI)
claude mcp add isaac-sim /path/to/isaacsim-mcp-server/scripts/run_mcp_server.sh
Or edit ~/.claude.json / .mcp.json:
{
  "mcpServers": {
    "isaac-sim": {
      "command": "/path/to/isaacsim-mcp-server/scripts/run_mcp_server.sh"
    }
  }
}
On Windows, wrap the PowerShell launcher:
claude mcp add isaac-sim -- powershell -NoProfile -ExecutionPolicy Bypass -File C:\path\to\isaacsim-mcp-server\scripts\run_mcp_server.ps1
{
  "mcpServers": {
    "isaac-sim": {
      "command": "powershell",
      "args": ["-NoProfile", "-ExecutionPolicy", "Bypass", "-File", "C:\\path\\to\\isaacsim-mcp-server\\scripts\\run_mcp_server.ps1"]
    }
  }
}
VS Code
Create .vscode/mcp.json in your workspace:
{
  "servers": {
    "isaac-sim": {
      "command": "/path/to/isaacsim-mcp-server/scripts/run_mcp_server.sh"
    }
  }
}
On Windows, wrap the PowerShell launcher:
{
  "servers": {
    "isaac-sim": {
      "command": "powershell",
      "args": ["-NoProfile", "-ExecutionPolicy", "Bypass", "-File", "C:\\path\\to\\isaacsim-mcp-server\\scripts\\run_mcp_server.ps1"]
    }
  }
}
Cursor
Open Cursor Settings > MCP, or edit ~/.cursor/mcp.json:
{
  "mcpServers": {
    "isaac-sim": {
      "command": "/path/to/isaacsim-mcp-server/scripts/run_mcp_server.sh"
    }
  }
}
On Windows, wrap the PowerShell launcher:
{
  "mcpServers": {
    "isaac-sim": {
      "command": "powershell",
      "args": ["-NoProfile", "-ExecutionPolicy", "Bypass", "-File", "C:\\path\\to\\isaacsim-mcp-server\\scripts\\run_mcp_server.ps1"]
    }
  }
}
Claude Desktop
Edit the config file for your platform:
- macOS:
~/Library/Application Support/Claude/claude_desktop_config.json - Windows:
%APPDATA%\Claude\claude_desktop_config.json - Linux:
~/.config/Claude/claude_desktop_config.json
{
  "mcpServers": {
    "isaac-sim": {
      "command": "/path/to/isaacsim-mcp-server/scripts/run_mcp_server.sh"
    }
  }
}
On Windows, wrap the PowerShell launcher:
{
  "mcpServers": {
    "isaac-sim": {
      "command": "powershell",
      "args": ["-NoProfile", "-ExecutionPolicy", "Bypass", "-File", "C:\\path\\to\\isaacsim-mcp-server\\scripts\\run_mcp_server.ps1"]
    }
  }
}
Windsurf
Open Windsurf Settings > MCP or edit ~/.codeium/windsurf/mcp_config.json:
{
  "mcpServers": {
    "isaac-sim": {
      "command": "/path/to/isaacsim-mcp-server/scripts/run_mcp_server.sh"
    }
  }
}
On Windows, wrap the PowerShell launcher:
{
  "mcpServers": {
    "isaac-sim": {
      "command": "powershell",
      "args": ["-NoProfile", "-ExecutionPolicy", "Bypass", "-File", "C:\\path\\to\\isaacsim-mcp-server\\scripts\\run_mcp_server.ps1"]
    }
  }
}
Antigravity
Open the agent side panel, click … > MCP Servers > Manage MCP Servers >
View raw config, or edit ~/.gemini/config/mcp_config.json (global) or
.agents/mcp_config.json (workspace):
{
  "mcpServers": {
    "isaac-sim": {
      "command": "/path/to/isaacsim-mcp-server/scripts/run_mcp_server.sh"
    }
  }
}
On Windows, wrap the PowerShell launcher:
{
  "mcpServers": {
    "isaac-sim": {
      "command": "powershell",
      "args": ["-NoProfile", "-ExecutionPolicy", "Bypass", "-File", "C:\\path\\to\\isaacsim-mcp-server\\scripts\\run_mcp_server.ps1"]
    }
  }
}
JetBrains IDEs
Go to Settings > Tools > AI Assistant > MCP Servers and add the server, with
the command /path/to/isaacsim-mcp-server/scripts/run_mcp_server.sh. See the
JetBrains MCP docs for details.
On Windows, set the command to powershell and the arguments to
-NoProfile -ExecutionPolicy Bypass -File C:\path\to\isaacsim-mcp-server\scripts\run_mcp_server.ps1.
4. Start prompting
Check the connection with get_scene_info.
If the scene is empty, create a physics scene.
Add a Franka robot at the origin and a Go1 quadruped at [2, 0, 0].
Architecture
MCP Client (IDE)
      |
      v
isaacsim-mcp-server          (PyPI package / CLI)
      |
      v  TCP socket (localhost:8766)
      |
isaac.sim.mcp_extension      (Omniverse extension)
      |
      v
Handlers -> Adapter -> Isaac Sim 5.1 / 6.0 APIs
Tools
43 tools across 9 categories:
| Category | Count | What you can do |
|---|---|---|
| Scene | 7 | Inspect scenes, create physics, list/load environments, browse prims |
| Objects | 4 | Create, delete, transform, and clone primitives |
| Lighting | 2 | Create and tune lights |
| Robots | 6 | Spawn 107+ robots, inspect joints, set positions, refresh library |
| Sensors | 4 | Create cameras/LiDAR, capture images, get point clouds |
| Materials | 2 | Create and apply materials |
| Assets | 4 | Import URDF, load/search USD, generate 3D models |
| Graphs | 2 | Build and edit Action Graphs (OnPlaybackTick, ScriptNode, script file attachment) |
| Simulation | 11 | Play/pause/stop/step, execute Python, inspect physics, hot-reload |
Full tool list
Scene: get_scene_info create_physics_scene clear_scene list_prims get_prim_info list_environments load_environment
Objects: create_object delete_object transform_object clone_object
Lighting: create_light modify_light
Robots: create_robot list_available_robots refresh_robot_library get_robot_info set_joint_positions get_joint_positions
Sensors: create_camera capture_image create_lidar get_lidar_point_cloud
Materials: create_material apply_material
Assets: import_urdf load_usd search_usd generate_3d
Graphs: create_action_graph edit_action_graph
Simulation: play_simulation pause_simulation stop_simulation step_simulation set_physics_params get_isaac_logs get_simulation_state get_physics_state get_joint_config set_drive_params execute_script reload_script
Known Limitations
Open defects a normal session can hit. Each is warned about at the point of use where that is possible; this list is for choosing a runtime before you start.
| Affects | What happens | Issue |
|---|---|---|
| 6.0 Newton | Joint drives do not converge — a commanded target is overshot and the joint keeps going, and joint limits are not enforced. Scene setup, stepping and inspection are fine; run motion work on PhysX (isaac-sim.sh). | #21 |
| 6.0 | The first RTX camera created in a session cannot be removed. create_camera warns once when it hands you that camera. | #20 |
| 5.1 | get_lidar_point_cloud fills on roughly a third of reads, so a caller must retry. A lidar created while the timeline is running never fills at all — create it stopped. | #31 |
| 5.1 | An RTX lidar prim cannot be deleted; the prim is left behind as a Camera. create_lidar refuses such a path and names a free one. | #25 |
Example Prompts
Scene bootstrap
Check the connection with get_scene_info. If the scene is empty, create a physics scene.
Add stronger lighting and place a camera that looks at the workspace.
Robot layout
Create three Franka robots in a row at [0,0,0], [2,0,0], and [4,0,0].
Then add a Go1 robot at [1, 3, 0].
Environment loading
List available environments, choose a warehouse-like one, and load it.
Create a camera and capture an image.
Asset search and 3D generation
Search for a rusty desk, load the best result near [0, 5, 0], scaled to [2, 2, 2].
Advanced Usage
Multiple Instances
Run multiple Isaac Sim sessions side by side. Each uses a different port (auto-assigned from 8766).
# First instance (default port 8766)
claude mcp add isaac-sim /path/to/isaacsim-mcp-server/scripts/run_mcp_server.sh

# Second instance (port 8767)
claude mcp add isaac-sim-2 -e ISAAC_MCP_PORT=8767 -- /path/to/isaacsim-mcp-server/scripts/run_mcp_server.sh
JSON config for multiple instances
{
  "mcpServers": {
    "isaac-sim": {
      "command": "/path/to/isaacsim-mcp-server/scripts/run_mcp_server.sh"
    },
    "isaac-sim-2": {
      "command": "/path/to/isaacsim-mcp-server/scripts/run_mcp_server.sh",
      "env": { "ISAAC_MCP_PORT": "8767" }
    }
  }
}
Desktop Launcher (Linux)
Install a dedicated Isaac Sim MCP application icon:
./scripts/install_desktop_entry.sh
This creates a launcher that auto-assigns ports, waits for the extension socket, and cleans up on exit.
Recommended Workflow
- Start with
get_scene_infoto verify the connection - Create a physics scene if the stage is empty
- Prefer purpose-built tools before
execute_script - Use
list_available_robots/list_environmentsbefore loading - Use
create_action_graphto wire OnPlaybackTick → ScriptNode controllers - Use
step_simulationwithobserve_primsandobserve_jointsfor debugging - Use
reload_scriptto iterate on controllers without restarting
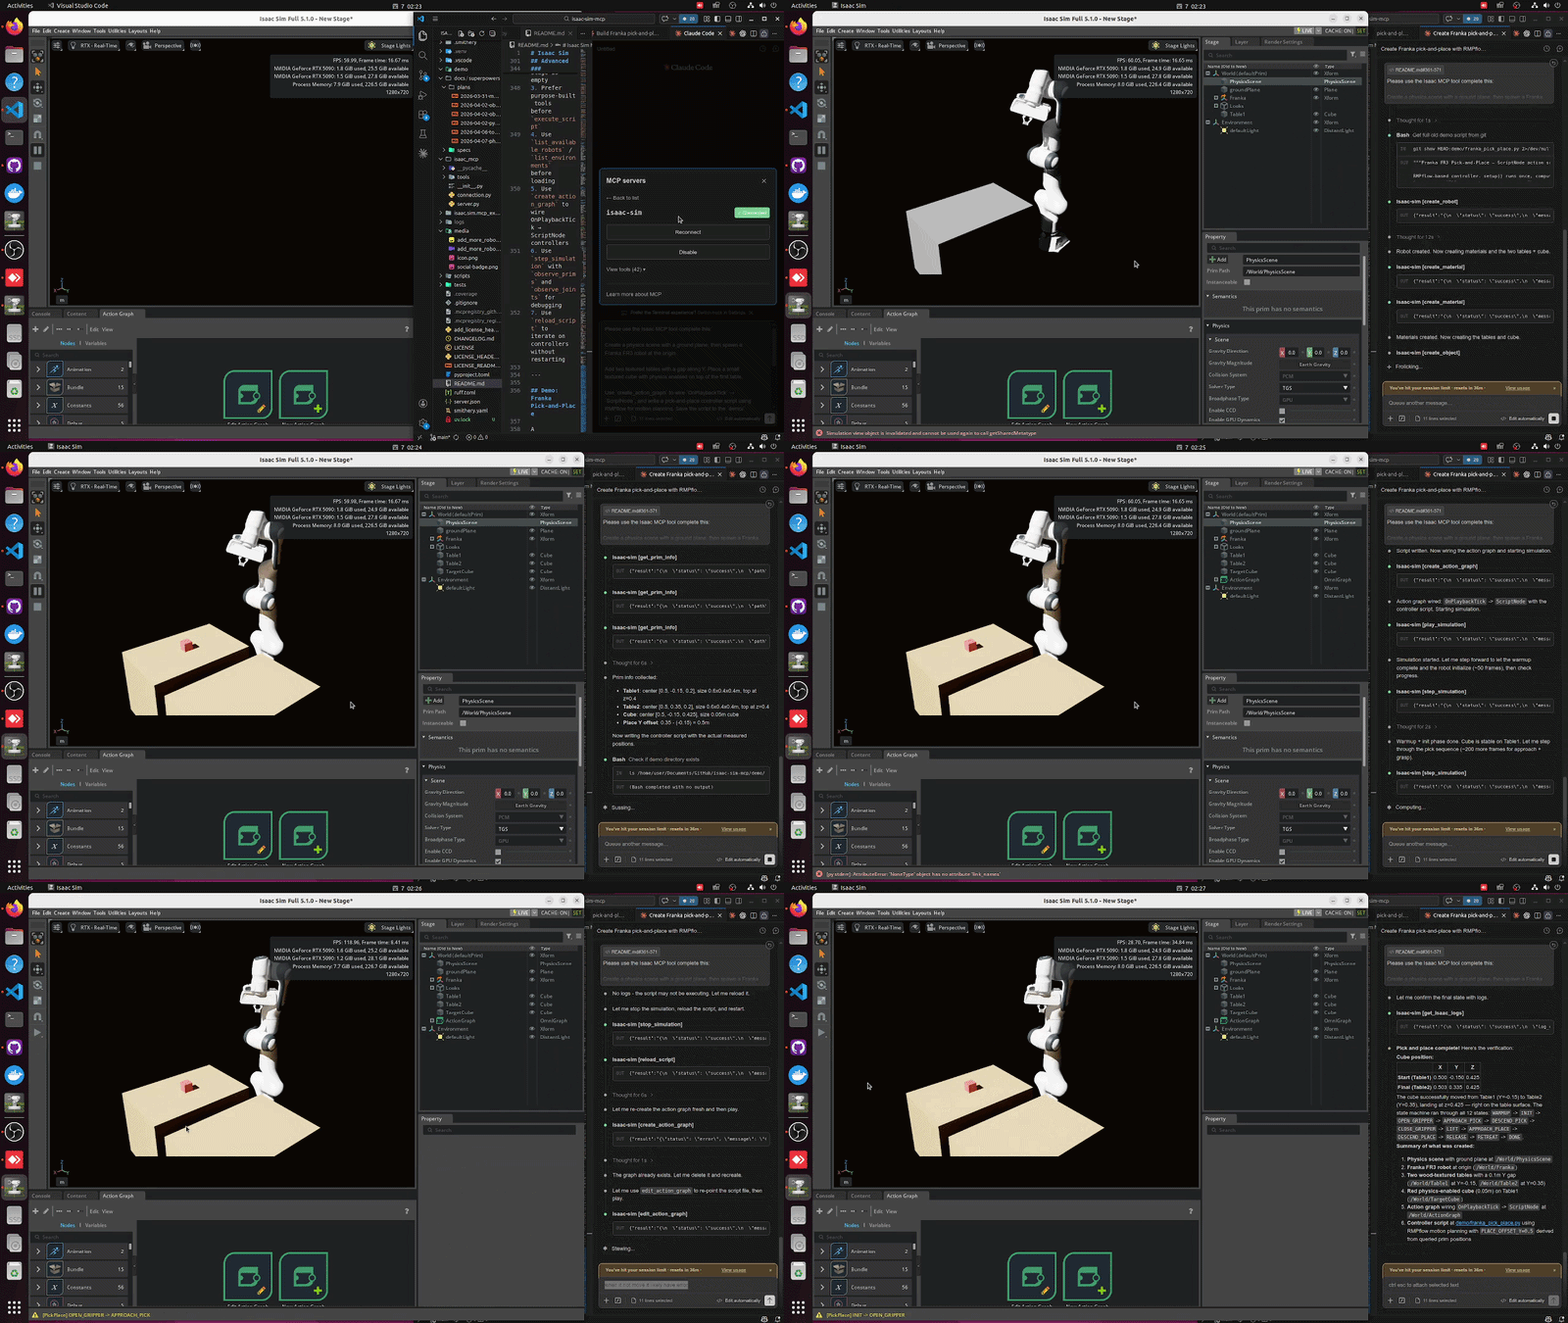
Demo: Franka Pick-and-Place
A ready-to-run demo at demo/franka_pick_place.py using RMPflow for motion planning:
Please use the Isaac MCP tool complete this:

Create a physics scene with a ground plane, then spawn a Franka FR3 robot at the origin.

Add two textured tables with a gap along Y. Place a small textured cube with physics enabled on top of the first table.

Use `create_action_graph` to wire `OnPlaybackTick` → `ScriptNode`, and write a pick-and-place controller script using RMPflow for motion planning. Save the script to the `demo/` directory.

Use `get_prim_info` to query actual positions and sizes of the tables and cube before writing the controller — do not hardcode coordinates.

Start the simulation with Play. The robot should pick the cube from table 1 and place it on table 2. Verify the process using `step_simulation` with `observe_prims` on the cube to confirm it reaches table 2.
Uses create_action_graph with script_file for one-step Action Graph + ScriptNode setup, plus the observability tools: get_joint_config, step_simulation with observe_prims, get_physics_state, and edit_action_graph for script hot-reload.
Development
# Run the MCP inspector
./.venv/bin/python -m mcp dev ./isaac_mcp/server.py
The inspector is available at http://localhost:5173.
Setup Notes
| Script | Purpose | Default |
|---|---|---|
setup_python_env.sh | Create venv and install package | Python 3.10 |
run_isaac_sim.sh | Launch Isaac Sim with extension (Linux) | $HOME/isaacsim |
run_isaac_sim.ps1 | Launch Isaac Sim with extension (Windows) | C:\isaacsim |
run_mcp_server.sh | Start the MCP server (Linux) | Port 8766 |
run_mcp_server.ps1 | Start the MCP server (Windows) | Port 8766 |
launch_isaac_sim_mcp.sh | Combined launcher | Auto-assigns port |
dev_mcp_server.sh | Dev server with hot-reload | Port 8766 |
Override defaults:
PYTHON_SPEC=3.11 ./scripts/setup_python_env.sh
ISAACSIM_ROOT=/opt/isaacsim ./scripts/run_isaac_sim.sh
ISAACSIM_ENGINE=newton ./scripts/run_isaac_sim.sh
Engine selection lives in scripts/lib/isaac_launcher.sh: each engine maps to
the launcher script Isaac Sim ships for it. Adding an entry to that map is all a
new backend needs — it enables both ISAACSIM_ENGINE=<name> and --<name> in
every launcher script.
Troubleshooting
If Isaac Sim says Can't find extension with name: isaac.sim.mcp_extension:
# Make sure you're in the repo root
pwd
test -f ./isaac.sim.mcp_extension/config/extension.toml && echo OK
Note: --ext-folder must point to the repo root, not to isaac.sim.mcp_extension/ directly.
Contributing
Pull requests are welcome. Improvements to tools, docs, adapters, and tests are all useful.
License
MIT License. Copyright (c) 2023-2025 omni-mcp, Copyright (c) 2026 whats2000. See LICENSE.
Featured
Keeps your Mac awake while Claude Code, Codex or Cursor works. Lets it sleep when they are done.
Try free for 7 days →Block distracting apps from your iPhone permanently without a 3rd party app. Free and open source.
Block now (100% free) →Notes, actions and memory. Without a meeting bot. First month 100% off.
Download for free →belt cli automatically finds the best tools and skills for your agent. image, video, music, tts...
one prompt install →Free an open-source skills that make AI coding agents easier to understand, verify, and control.
Download for free →Connect your Claude agent to live crypto prices and trading routes via 1inch
Get the MCP →Categories
Registryactive
Packageisaacsim-mcp-server
TransportSTDIO
UpdatedApr 2, 2026


